I used to show up to engagement sessions and spend the first twenty minutes just managing chaos. One partner was dressed for a concert, the other for a job interview. Nobody knew how long we’d be shooting. And at least once, we arrived at a location that was half-demolished by a construction crew. Every one of those problems was preventable, and every one of them was my fault for not communicating clearly enough in advance.
That’s why this CreativeLive tutorial stopped me mid-scroll when I found it. In it, photographer Jasmine Star walks through the exact email framework she sends to clients about a month before every engagement session. It’s not complicated. But it is deliberate, and that’s the part most photographers skip. Watch the full tutorial on YouTube and then come back here for the breakdown.
The core idea is this: clients cannot meet expectations they were never given. A prep email isn’t administrative busywork. It’s the difference between a shoot that flows and a shoot you’re constantly rescuing. Here’s how she structures it.
Step 1: Send the Email Four Weeks Out, Not One
 Photographer explaining the four-week email timing rationale
Timing is the first decision and it matters more than most photographers realize. One week before the shoot is too late. By that point, clients have already made decisions about outfits, locations, and hair appointments. You’re not setting expectations at that point, you’re just creating anxiety.
Photographer explaining the four-week email timing rationale
Timing is the first decision and it matters more than most photographers realize. One week before the shoot is too late. By that point, clients have already made decisions about outfits, locations, and hair appointments. You’re not setting expectations at that point, you’re just creating anxiety.
Four weeks gives clients enough runway to actually act on your guidance. They can book a hair trial. They can scout a location. They can loop their partner in without it feeling last-minute. That buffer is what makes the email useful rather than just informational.
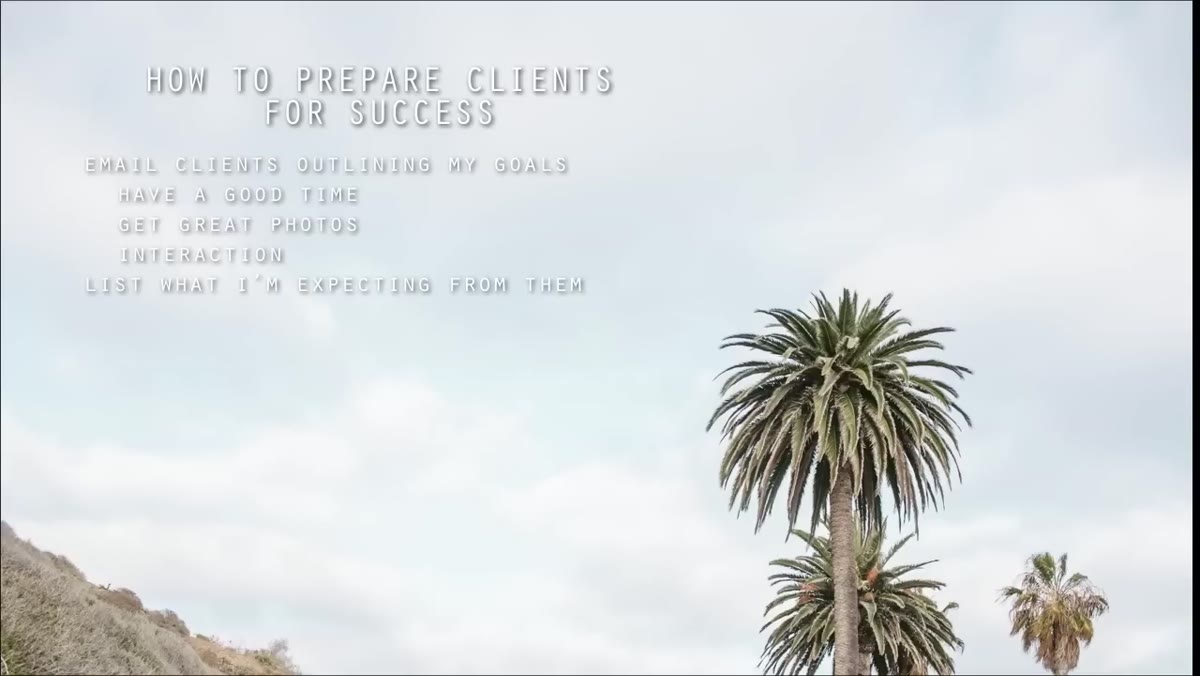
Step 2: Lead With Your Goals for the Session
 Photographer outlining the three goals she states in the prep email
Before you list a single logistical requirement, tell clients what you want for them. Jasmine’s email opens by stating three things: she wants them to have a good time, she wants them to walk away with great photos, and she wants the session to function as a low-stakes preview of how you’ll all work together before the wedding day.
Photographer outlining the three goals she states in the prep email
Before you list a single logistical requirement, tell clients what you want for them. Jasmine’s email opens by stating three things: she wants them to have a good time, she wants them to walk away with great photos, and she wants the session to function as a low-stakes preview of how you’ll all work together before the wedding day.
This framing does something important. It shifts the tone from “here are the rules” to “here’s what I’m working toward on your behalf.” Clients who understand your intentions are more likely to trust your direction when you’re actually on location. I added this framing to my own prep emails two years ago and the difference in how clients show up, emotionally, was immediate.
Step 3: Set Clear Logistical Expectations
 Photographer listing specific expectations: punctuality, outfit changes, locations
After the goals, get specific about the mechanics. Jasmine outlines three things clients should know: be on time, they get one outfit change, and they get one location change. Simple. But the piece that most photographers leave out is the location responsibility piece.
Photographer listing specific expectations: punctuality, outfit changes, locations
After the goals, get specific about the mechanics. Jasmine outlines three things clients should know: be on time, they get one outfit change, and they get one location change. Simple. But the piece that most photographers leave out is the location responsibility piece.
She explicitly puts the burden of researching location permits, construction schedules, and shoot fees on the client. Not because it’s someone else’s problem, but because the client chose the location. If there’s a fee to shoot there, they need to know to handle it before the session, not when you’re both standing at a locked gate. Put this in writing. It protects you and it gives clients clear ownership of their part.
Step 4: Ask the Partner to Watch Past Engagement Slideshows
 Photographer describing the slideshow request for the less-engaged partner
This one is subtle but it changed how I think about the reluctant partner problem. Jasmine noticed a pattern: the bride had been following her work online for months and was fully invested. The groom often showed up treating the shoot like an errand on a long wedding to-do list.
Photographer describing the slideshow request for the less-engaged partner
This one is subtle but it changed how I think about the reluctant partner problem. Jasmine noticed a pattern: the bride had been following her work online for months and was fully invested. The groom often showed up treating the shoot like an errand on a long wedding to-do list.
Her solution was to ask the bride to have her partner watch a few of her past engagement slideshows before the session. When he sees the finished work, he understands why it matters to her. He stops thinking of it as a photography appointment and starts seeing it as something she cares about deeply. Most partners, once they get that, will show up differently. They’re not just tolerating the session anymore. That shift affects everything, including how natural they look in front of the camera.
Step 5: Encourage Professional Hair and Makeup
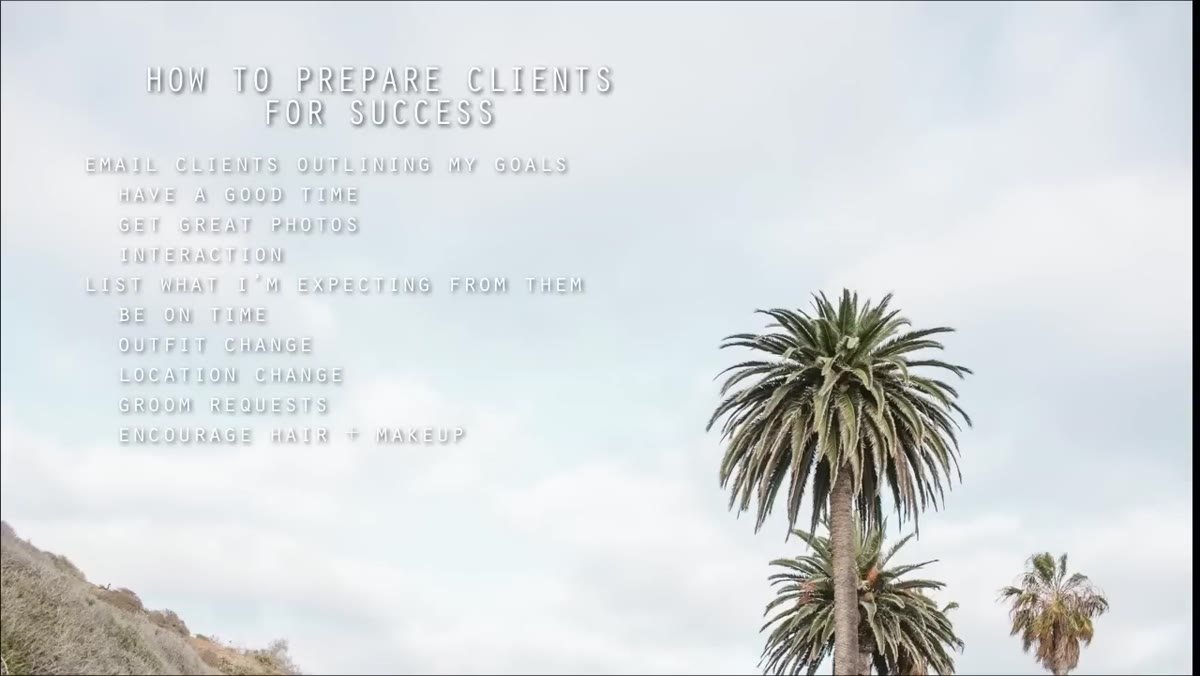 Photographer explaining how to frame the hair and makeup suggestion
Asking a client to get their hair and makeup professionally done for an engagement shoot can feel presumptuous. Jasmine’s workaround is to frame it as a practical benefit rather than a requirement. She positions it as a trial run: if the client is planning a hair and makeup trial before the wedding anyway, why not do it before the engagement session and see how it photographs?
Photographer explaining how to frame the hair and makeup suggestion
Asking a client to get their hair and makeup professionally done for an engagement shoot can feel presumptuous. Jasmine’s workaround is to frame it as a practical benefit rather than a requirement. She positions it as a trial run: if the client is planning a hair and makeup trial before the wedding anyway, why not do it before the engagement session and see how it photographs?
The logic is sound and the framing makes it easy for clients to say yes without feeling like they’re being told what to do. And from a purely technical standpoint, professionally done hair and makeup photographs better. Fuller stop. If you want better photos, you ask for the things that produce better photos.
Step 6: Ask About Props in Advance
 Photographer explaining the importance of knowing about props before the shoot
If a client is planning to bring a vintage bicycle, a custom neon sign, or a full picnic setup, you need to know that before you arrive. Props change how you shoot. They affect framing, timing, and sometimes location logistics entirely.
Photographer explaining the importance of knowing about props before the shoot
If a client is planning to bring a vintage bicycle, a custom neon sign, or a full picnic setup, you need to know that before you arrive. Props change how you shoot. They affect framing, timing, and sometimes location logistics entirely.
Jasmine asks about props in the prep email specifically so she has time to think through how they’ll fit into the session rather than improvising on the fly. A quick “are you planning to bring anything special?” in the email is all it takes. The goal is no surprises on shoot day.
My Add-On: Build a Response Checkpoint Into the Process
I take everything in this framework and add one layer that Jasmine doesn’t mention explicitly: a reply deadline. My prep email ends with a specific ask for the client to respond by a certain date confirming they’ve read it and noting anything they need to discuss.
This does two things. It tells me whether the email was actually read, which matters more than you’d think. And it creates a natural opening for clients to raise concerns before the session rather than during it. My client experience checklist has 47 line items on it, and a confirmed reply to the prep email is one of the first ones I check off. The sessions where I don’t get a reply are almost always the ones where something unexpected happens on the day.
The single biggest shift in my client sessions came from doing exactly what this tutorial describes: communicating expectations early and in writing, before there’s any opportunity for misalignment to take root. A thoughtful prep email costs you thirty minutes to write once and protects every engagement session you’ll ever shoot.
Watch the full tutorial on YouTube to hear Jasmine walk through her exact language and see how she balances directness with warmth throughout the email.
Comments
Leave a Comment